
Welcome to the Inspector Pool User Manual. This guide provides step-by-step instructions for using the mobile app to manage pool inspections, generate reports, and streamline your workflow.
Navigating the Inspector Pool app is intuitive and straightforward. Use the navigation bar at the bottom of the screen to switch between sections or swipe left and right to navigate from screen to screen.
The general workflow is outlined below, with a focus on creating comprehensive records for professional reports. While only a few fields are required, providing full detail enhances the quality and professionalism of your reports.
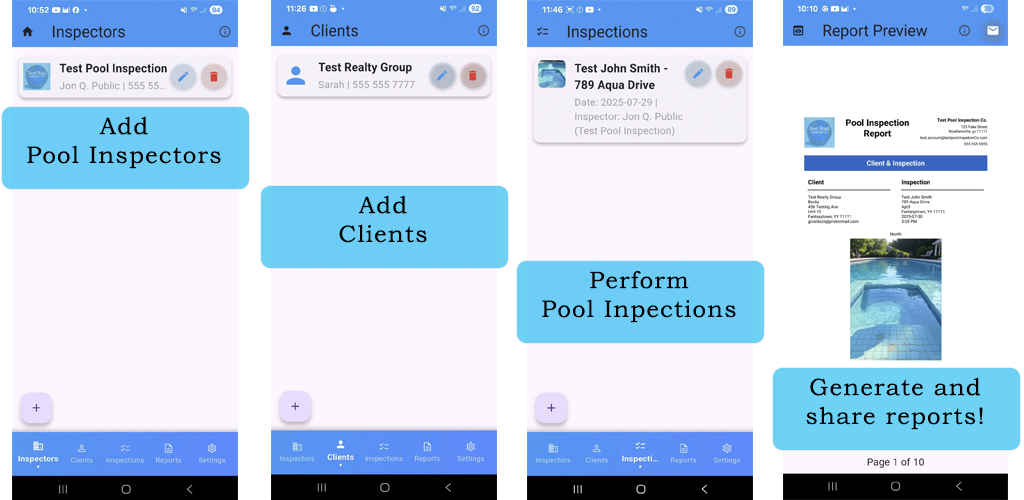
- Add an Inspector: Start by adding your Inspector/company profiles. Navigate to the Inspector screen and create a new inspector profile for each of your pool inspectors. Enter all relevant details, such as name and contact information, then save the record. You can edit this profile later if needed. This inspector will be selectable when creating an inspection record. Unless you need to change or add new inspectors, you only need to do this once.
- Add a Client: Next, you’ll want to create your client or customer profile. Go to the Client screen and add the client requesting the pool inspection. Input their details and save the record. This client will be selectable when creating an inspection record.
- Conduct an Inspection: When ready to perform a pool inspection, navigate to the Inspection screen and create a new inspection record. Select the appropriate inspector and client records created earlier, then complete the checklist questions and add all relevant details. Save the record when finished.
- Generate and Share a Report: After completing the inspection, go to the Report screen to create a report based on the inspection record. Reports are created immediately and are ready for review. Carefully review the report and then share it with your client or others. If changes are needed, return to the Inspection screen to edit the inspection record, then simply generate a new report. Delete any outdated or unnecessary reports.
Important Subscription Notes:
- The app starts with a 20-day free trial.
- After the trial, a subscription is required for full functionality.
For more detail on each screen workflow see those specific sections within the manual.
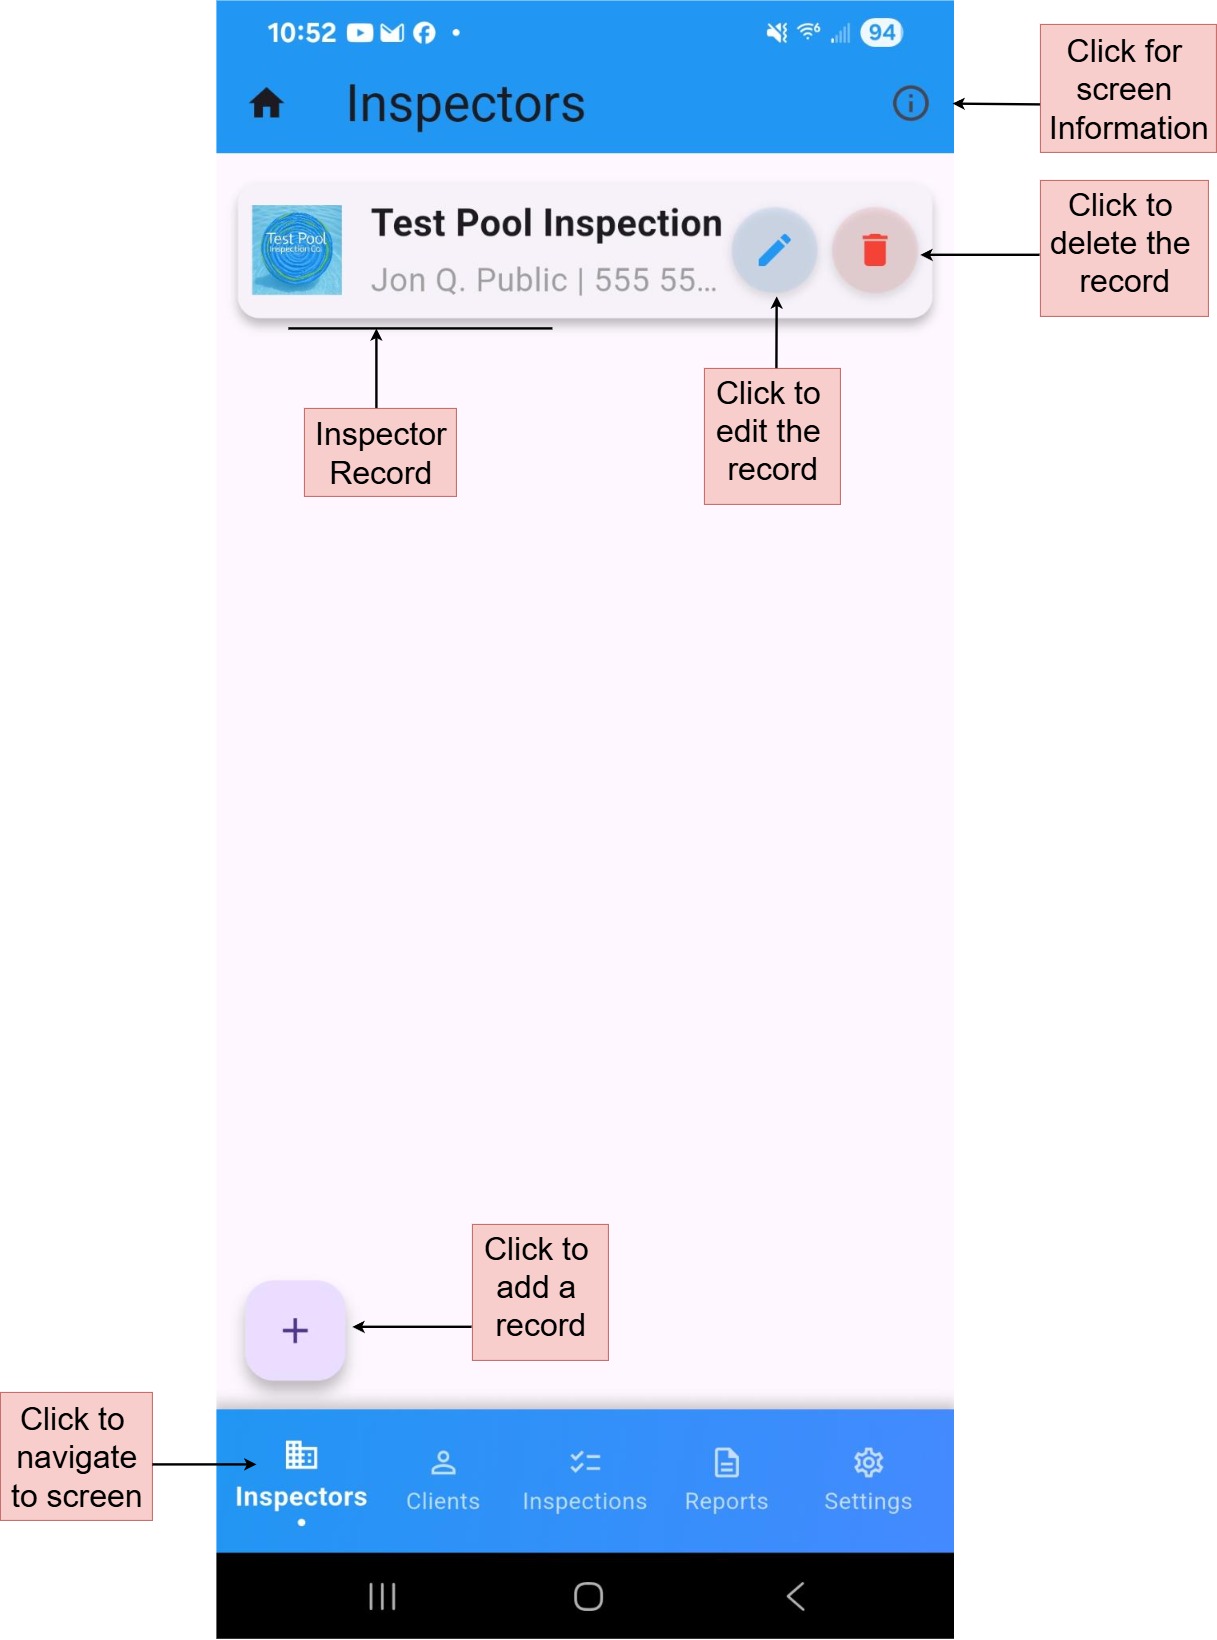
The Inspector screen allows you to manage pool inspector profiles, which also serve as your company information. Use this screen to create, edit, or delete inspector profile records. This information appears in the header and footer of inspection reports, ensuring a professional presentation.
In-App Help
Tap the information icon (i) in the upper right corner of the Inspectors screen to view helpful explanations directly in the app. This provides quick guidance on managing inspector profiles without needing to refer to this manual.
Adding a Record
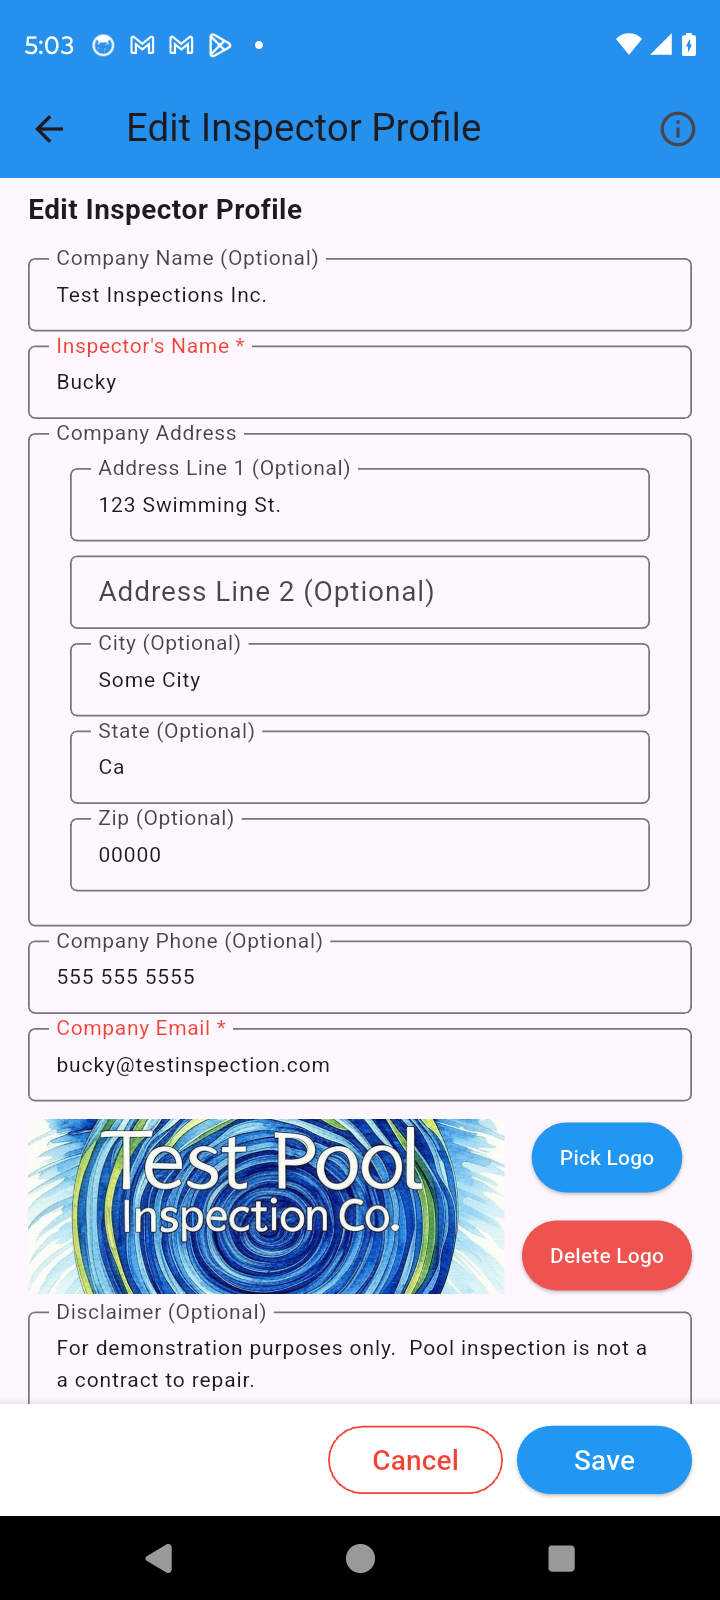
Navigate to the Inspector screen and click the floating plus button to open a form for entering relevant details. Complete the form and save it when finished.
Required Fields:
- Inspector’s Name
- Company Email
Optional Fields:
- Company Name
- Address
- Company Phone
- Logo Image
- Disclaimer
Editing a Record
Click the pencil icon on the record you wish to edit. The form will display the existing information. Make your changes, then save and close the form.
Important Notes:
- Changes to inspector records will not update existing reports.
- Only new reports referencing the updated inspector record will reflect the changes.
- Existing inspections linked to the edited inspector will display the updated information.
Copying a Record
You can quickly duplicate an inspector record by using the copy feature. This is useful when you have multiple similar inspector profiles or need to create variations.
Deleting a Record
Click the trash can icon on the record you want to delete, then confirm the dialog prompt to proceed.
Important Notes:
- Deleting a record is permanent and cannot be undone.
- Existing reports remain unaffected.
- Inspections referencing a deleted inspector may no longer display associated inspector details.
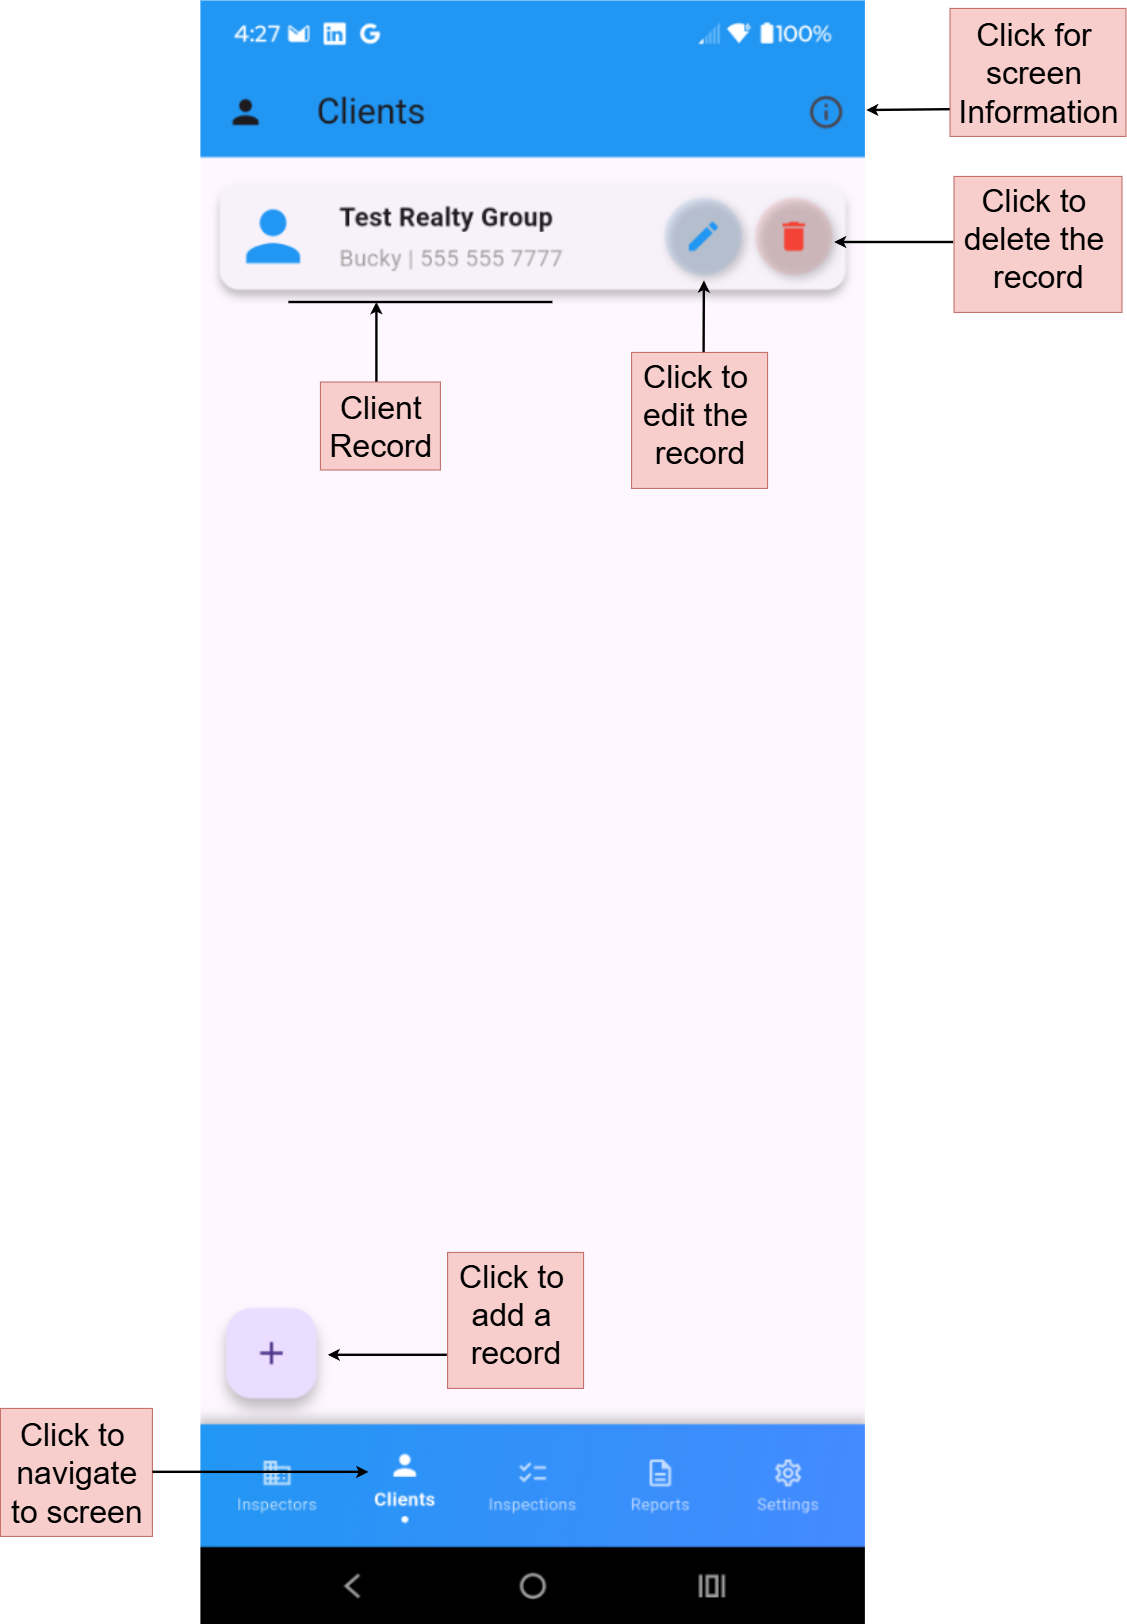
Clients are your customers that request pool inspections. The Client screen enables you to manage these profile records. Use this screen to create, edit, or delete client profiles, which store contact details and notes for easy reference during inspections and reporting.
In-App Help
Tap the information icon (i) in the upper right corner of the Clients screen to view helpful explanations directly in the app.
Adding a Record
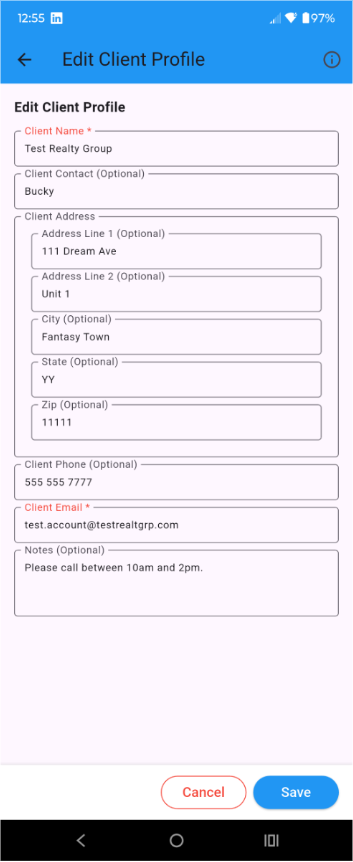
Navigate to the Client screen and click the floating plus button to open a form for entering client details. Fill out the form and save it when complete.
Required Fields:
- Client Name
- Client Email
Optional Fields:
- Client Phone
- Client Address
- Notes
Important Notes:
- Deleting a client record is permanent and cannot be undone.
- Existing reports remain unaffected.
- Inspections referencing a deleted client may no longer display associated client details.
- Notes do not appear on reports.
Editing a Record
Click the pencil icon on the client record you wish to edit. The form will display the existing details. Update the information as needed, then save and close the form.
Important Notes:
- Changes to client records will not update existing reports.
- Only new reports referencing the updated client record will reflect the changes.
- Existing inspections linked to the edited client will display the updated information.
Deleting a Record
Click the trash can icon on the client record you want to delete, then confirm the dialog prompt to proceed.
Important Notes:
- Deleting a client record is permanent and cannot be undone.
- Existing reports remain unaffected.
- Inspections referencing a deleted client may no longer display associated client details.
The Inspection screen allows you to create, edit, or delete inspection records for pool inspections. Use this screen to document all relevant details, including inspector and client associated to the inspection, and complete the inspection checklist. Ensure the desired checklist is set as default in the Settings section before starting a new inspection.
Note on Active Checklist: The top of the Inspections screen shows the currently active checklist (e.g., “App Provided Insp. List”). To change the default checklist used for new inspections, go to the Settings screen.
In-App Help
Tap the information icon (i) in the upper right corner of the Inspections screen to view helpful tips and explanations directly in the app.
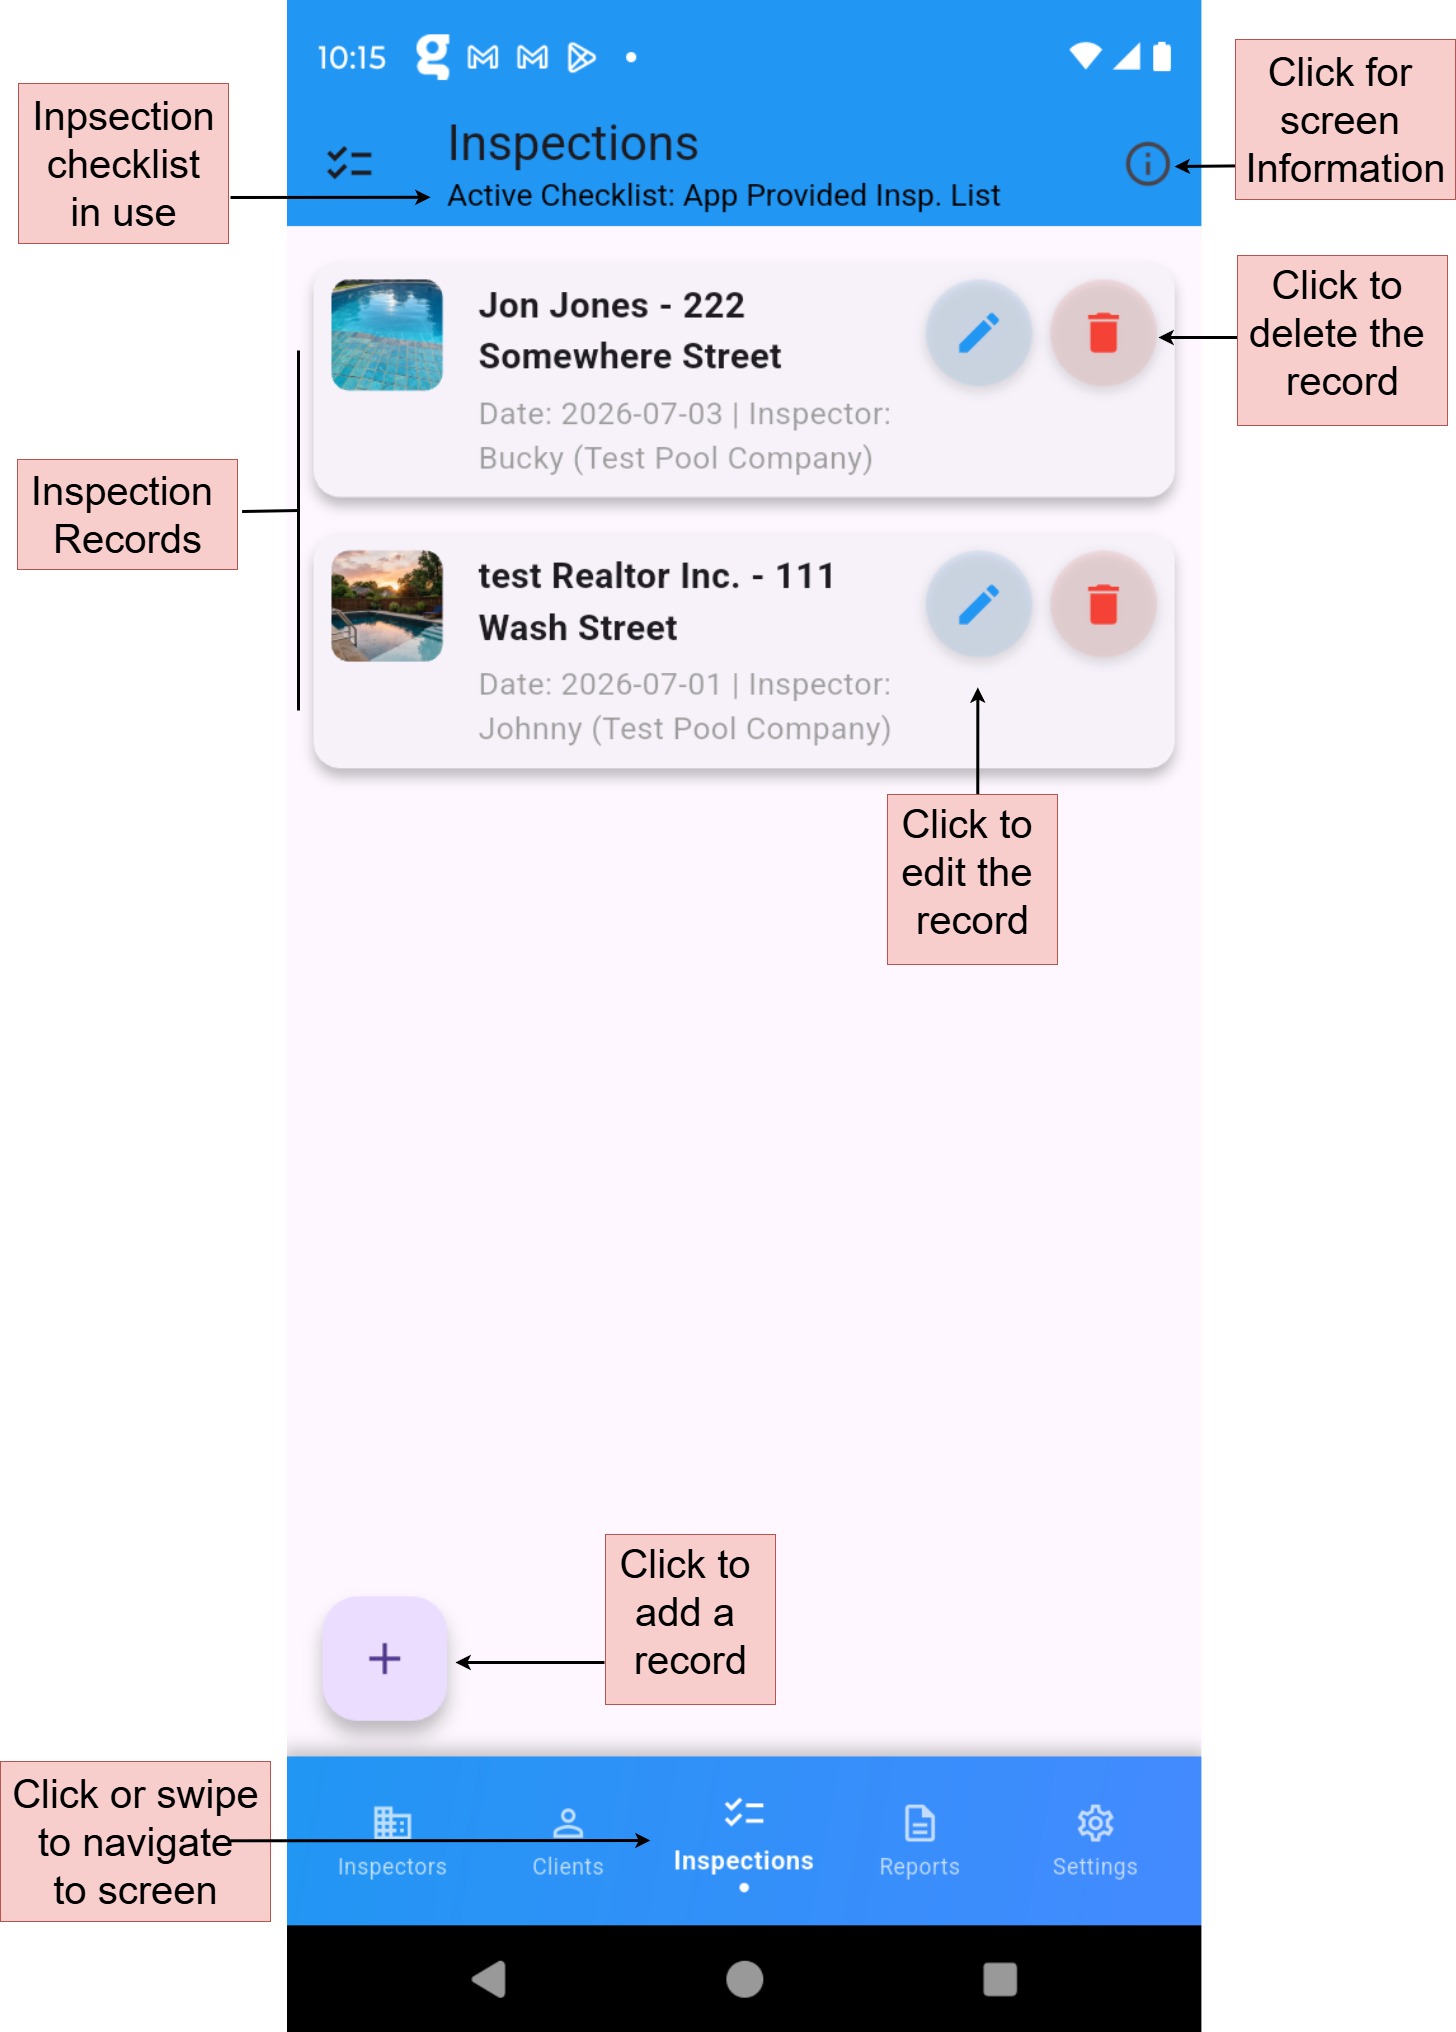
Adding a Record
Navigate to the Inspection screen and click the floating plus button to open a form for entering inspection details. Select the appropriate inspector and client records, complete the checklist, and add any additional notes or details. Save the record when finished.
Required Fields:
- Inspector
- Client
- Inspection Date and time
Optional Fields:
- Inspection Address
- Pool Image
- Summary
- Checklist Responses
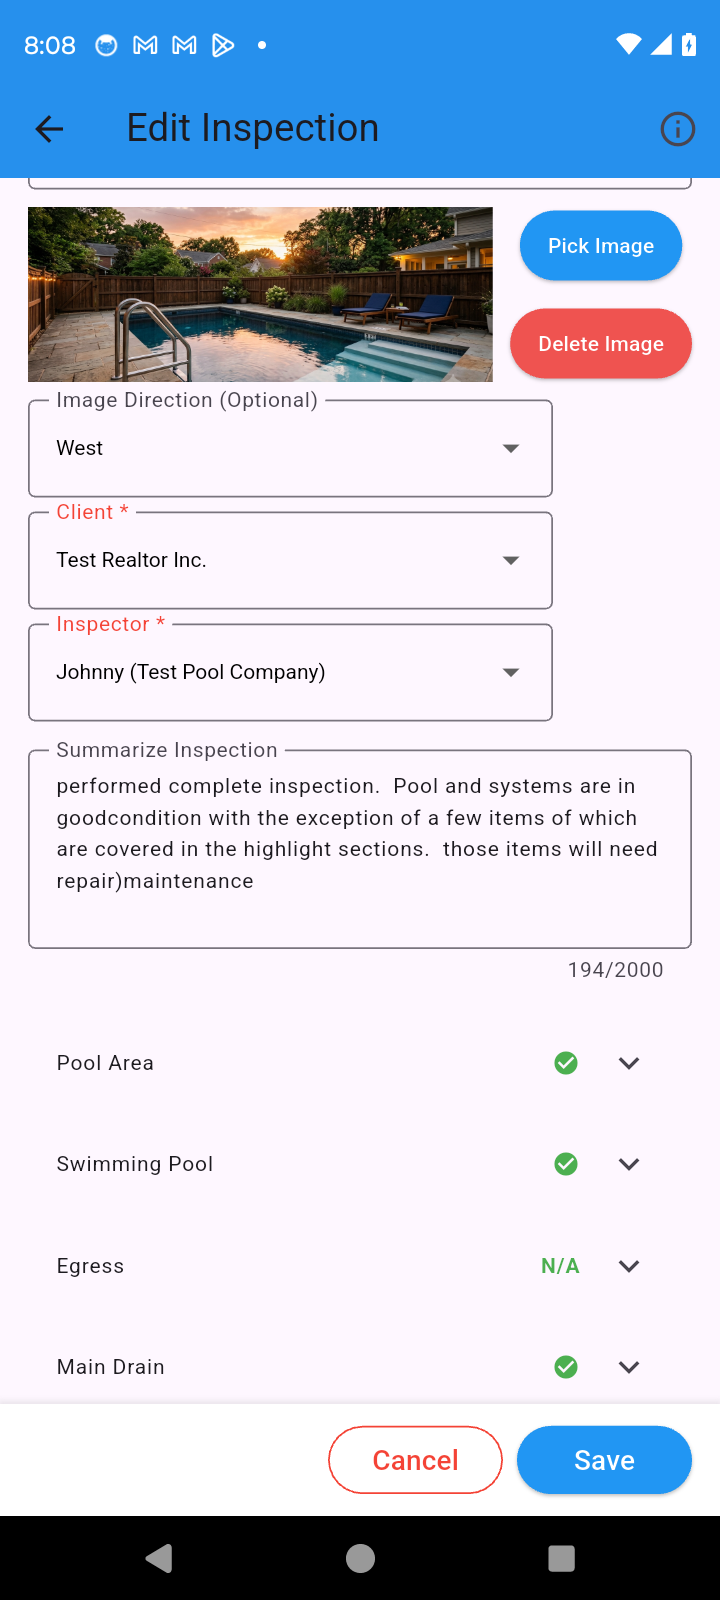
Editing a Record
Click the pencil icon on the inspection record you wish to edit. The form will display the existing details. Update the information as needed, then save and close the form.
Important Notes:
- Changes to inspection records will not update existing reports.
- Only new reports referencing the updated inspection record will reflect the changes.
Deleting a Record
Click the trash can icon on the inspection record you want to delete, then confirm the dialog prompt to proceed.
Important Notes:
- Deleting an inspection record is permanent and cannot be undone.
- Existing reports remain unaffected.
- Deleting an inspection record will remove it from the list of available records for generating new reports.
The Report screen allows you to generate, review, and share professional inspection reports based on completed inspection records. Reports are in PDF format. This screen streamlines the process of creating polished reports for clients and inspectors.
Reports are the core value of the app. After completing your data entry and checklist, you can instantly generate a professional, well-formatted PDF report with a single tap.
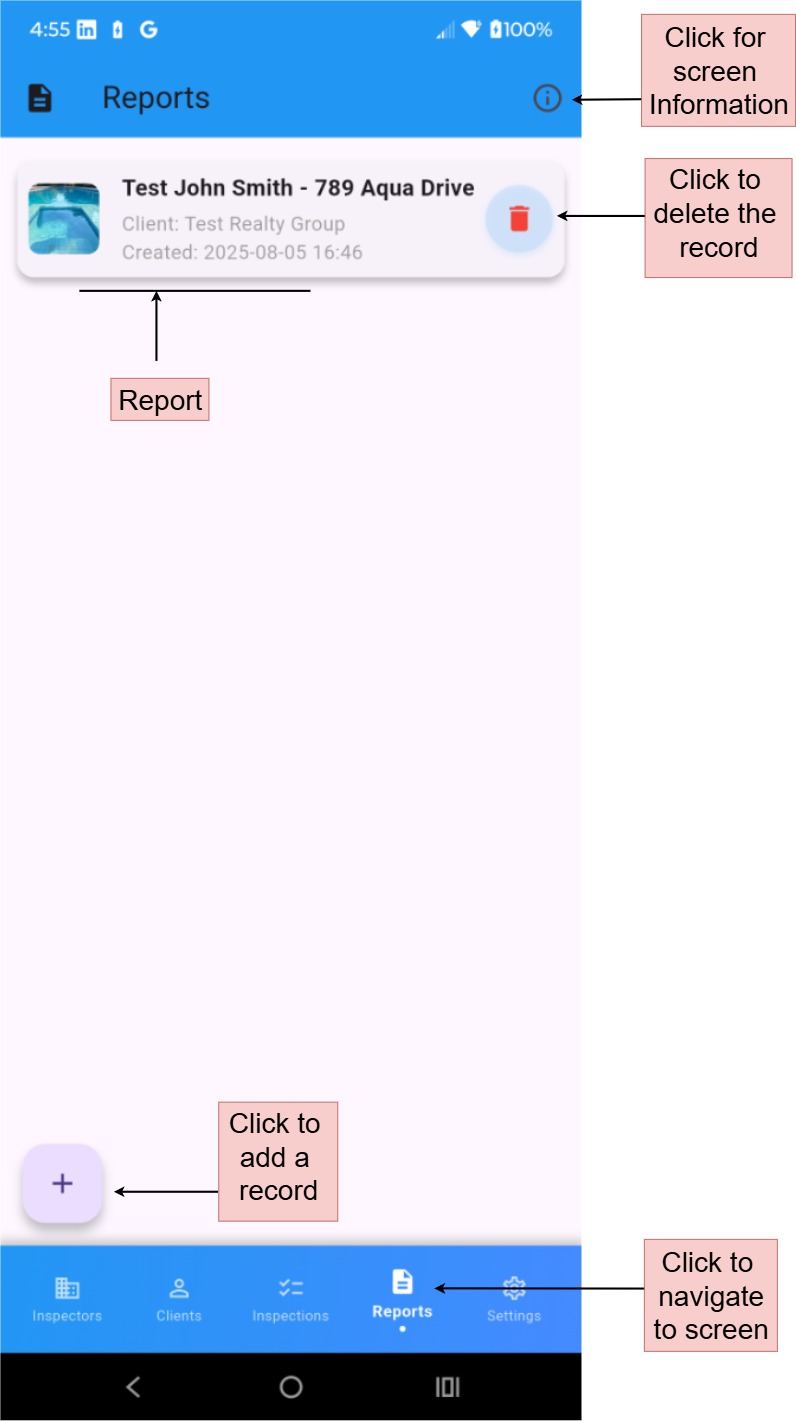
In-App Help
Tap the information icon (i) in the upper right corner of the Reports screen to view helpful tips directly in the app.
Generating a Report
Navigate to the Reports screen and click the floating plus button to create a new report. Select the completed inspection record you want to base the report on. The app will automatically populate the report with details from the inspection, inspector, and client records.
Important: If the inspection record is later edited, the report will show an "Outdated" badge. You should generate a new report after making changes to ensure the PDF reflects the latest information.
Report Layout Overview
A generated report typically includes the following sections:
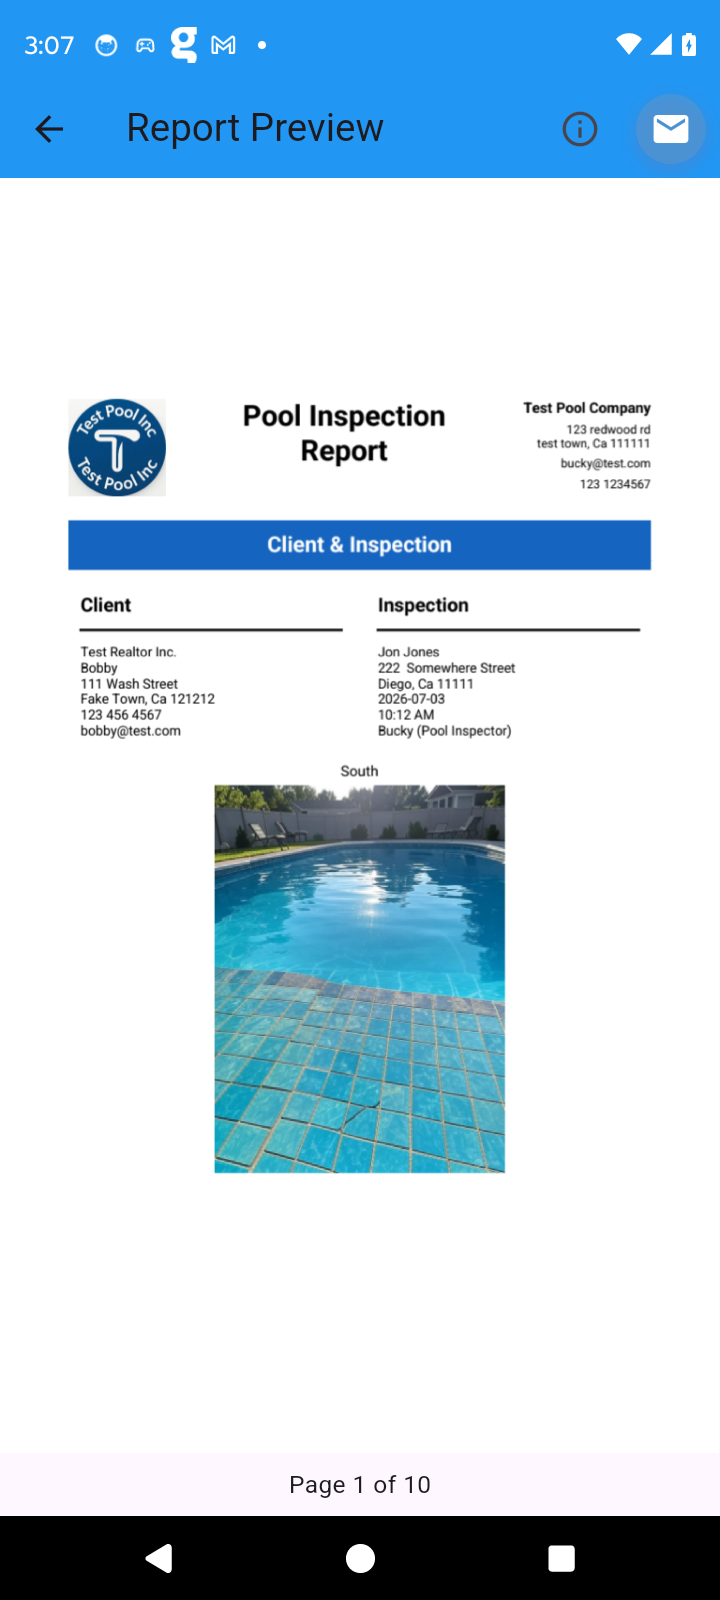
- Client & Inspection
Header with company logo, inspector/company details, client information, and basic inspection details (date, time, address, inspector name). - Inspection Summary and Highlights
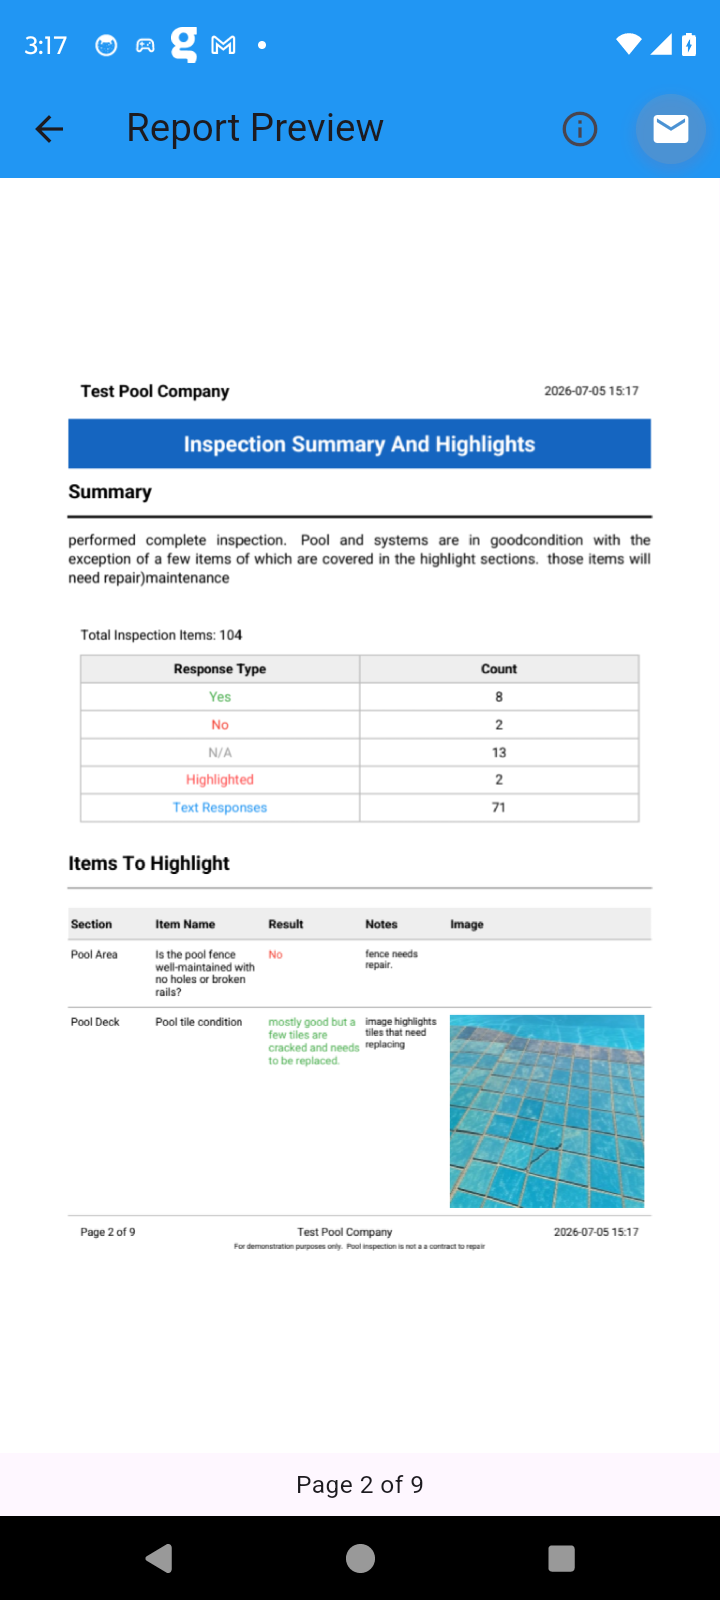
- A summary paragraph written by the inspector.
- A summary table showing counts of Yes / No / N/A / Highlighted / Text responses.
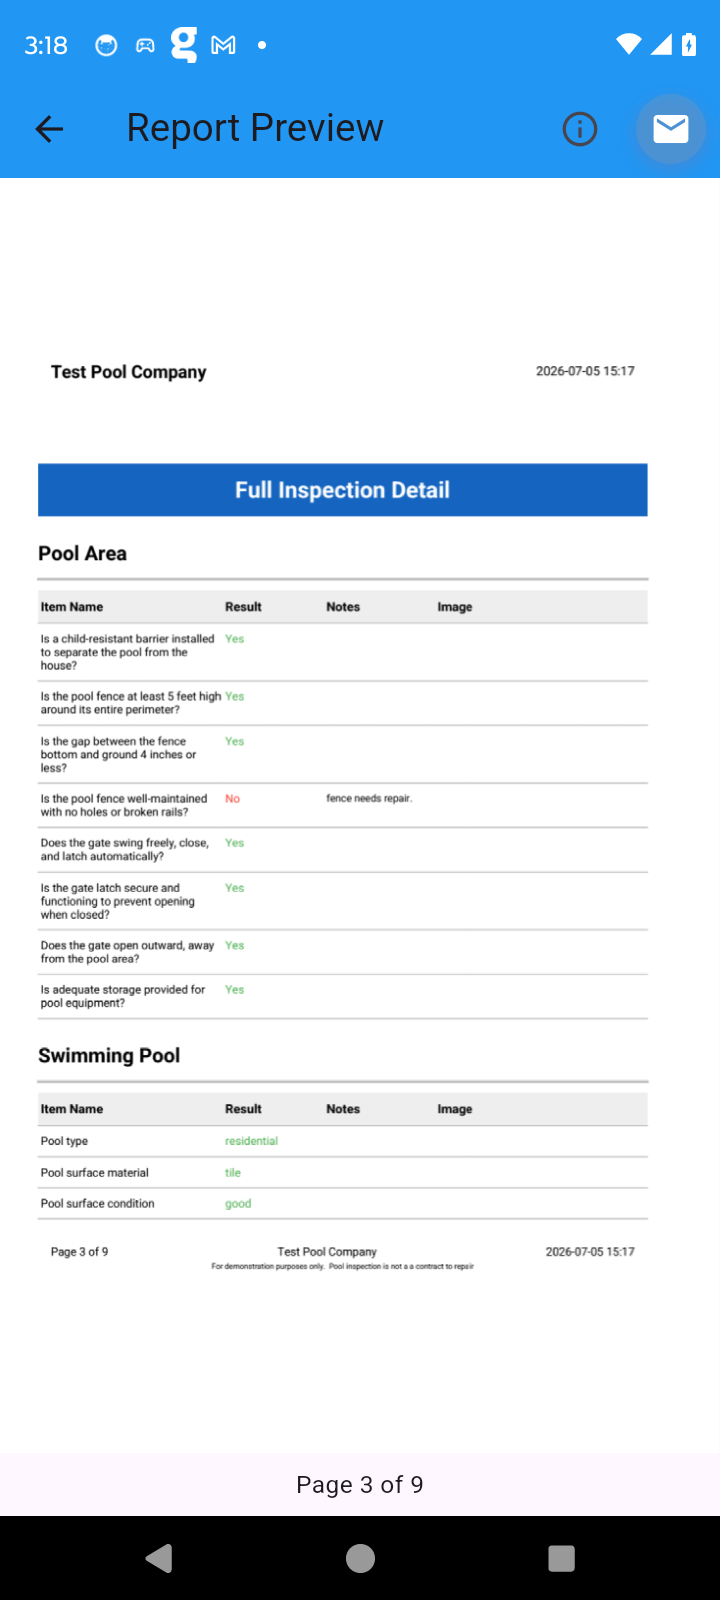
- Items To Highlight section — any checklist items marked “Highlight on Report” appear here with notes and images. This section is designed to draw attention to items that need follow-up or repair. - Full Inspection Detail
The complete checklist broken down by category (e.g., Pool Area, Swimming Pool, Equipment, etc.). Each item shows the result (Yes / No / N/A), any notes entered by the inspector, and attached images.
Tip: Use the "Highlight on Report" option on any item that needs attention. These items automatically appear in the prominent “Items To Highlight” section near the top of the report, making it easy for clients or reviewers to quickly see the most important findings without reading the entire document.
Previewing a Report
After generating a report, it will open the preview window. Clicking an existing report record will also open the preview window. Review the report carefully to ensure all details, including highlighted items, inspection data, inspector information, and client details, are accurate and complete before proceeding to share or save.
Sharing a Report
From the report preview, click the email icon in the top-right corner to share the report. Choose to send it to the inspector, client, or both. Click the Share option to view file sharing options. Selecting the preferred email client will open a draft email in that client. You can then edit the email further before sending it.
Important Notes:
- Ensure the report is accurate and complete before sharing.
- Clients may rely on these documents for professional communication.
Updating a Report
Reports cannot be edited directly. To update a report, return to the Inspection screen and edit the associated inspection record. After saving the changes, generate a new report from the Report screen. Delete outdated reports to avoid confusion.
Important Notes:
- Reports are static once generated.
- To reflect changes in inspection, inspector, or client details, you must create a new report after updating the relevant records.
Deleting a Report
Click the trash can icon on the report you want to delete, then confirm the dialog prompt to proceed.
Important Notes:
- Deleting a report is permanent and cannot be undone.
- Deleting a report does not affect the associated inspection, inspector, or client records.
The Settings screen empowers you to customize the Inspector Pool app to fit your workflow. From setting default inspection checklists to creating or importing custom checklists, accessing app information, managing your subscription, and support options, this section provides tools to enhance your inspection process.
In-App Help
Tap the information icon (i) in the upper right corner of the Settings screen to view helpful tips and explanations directly in the app.
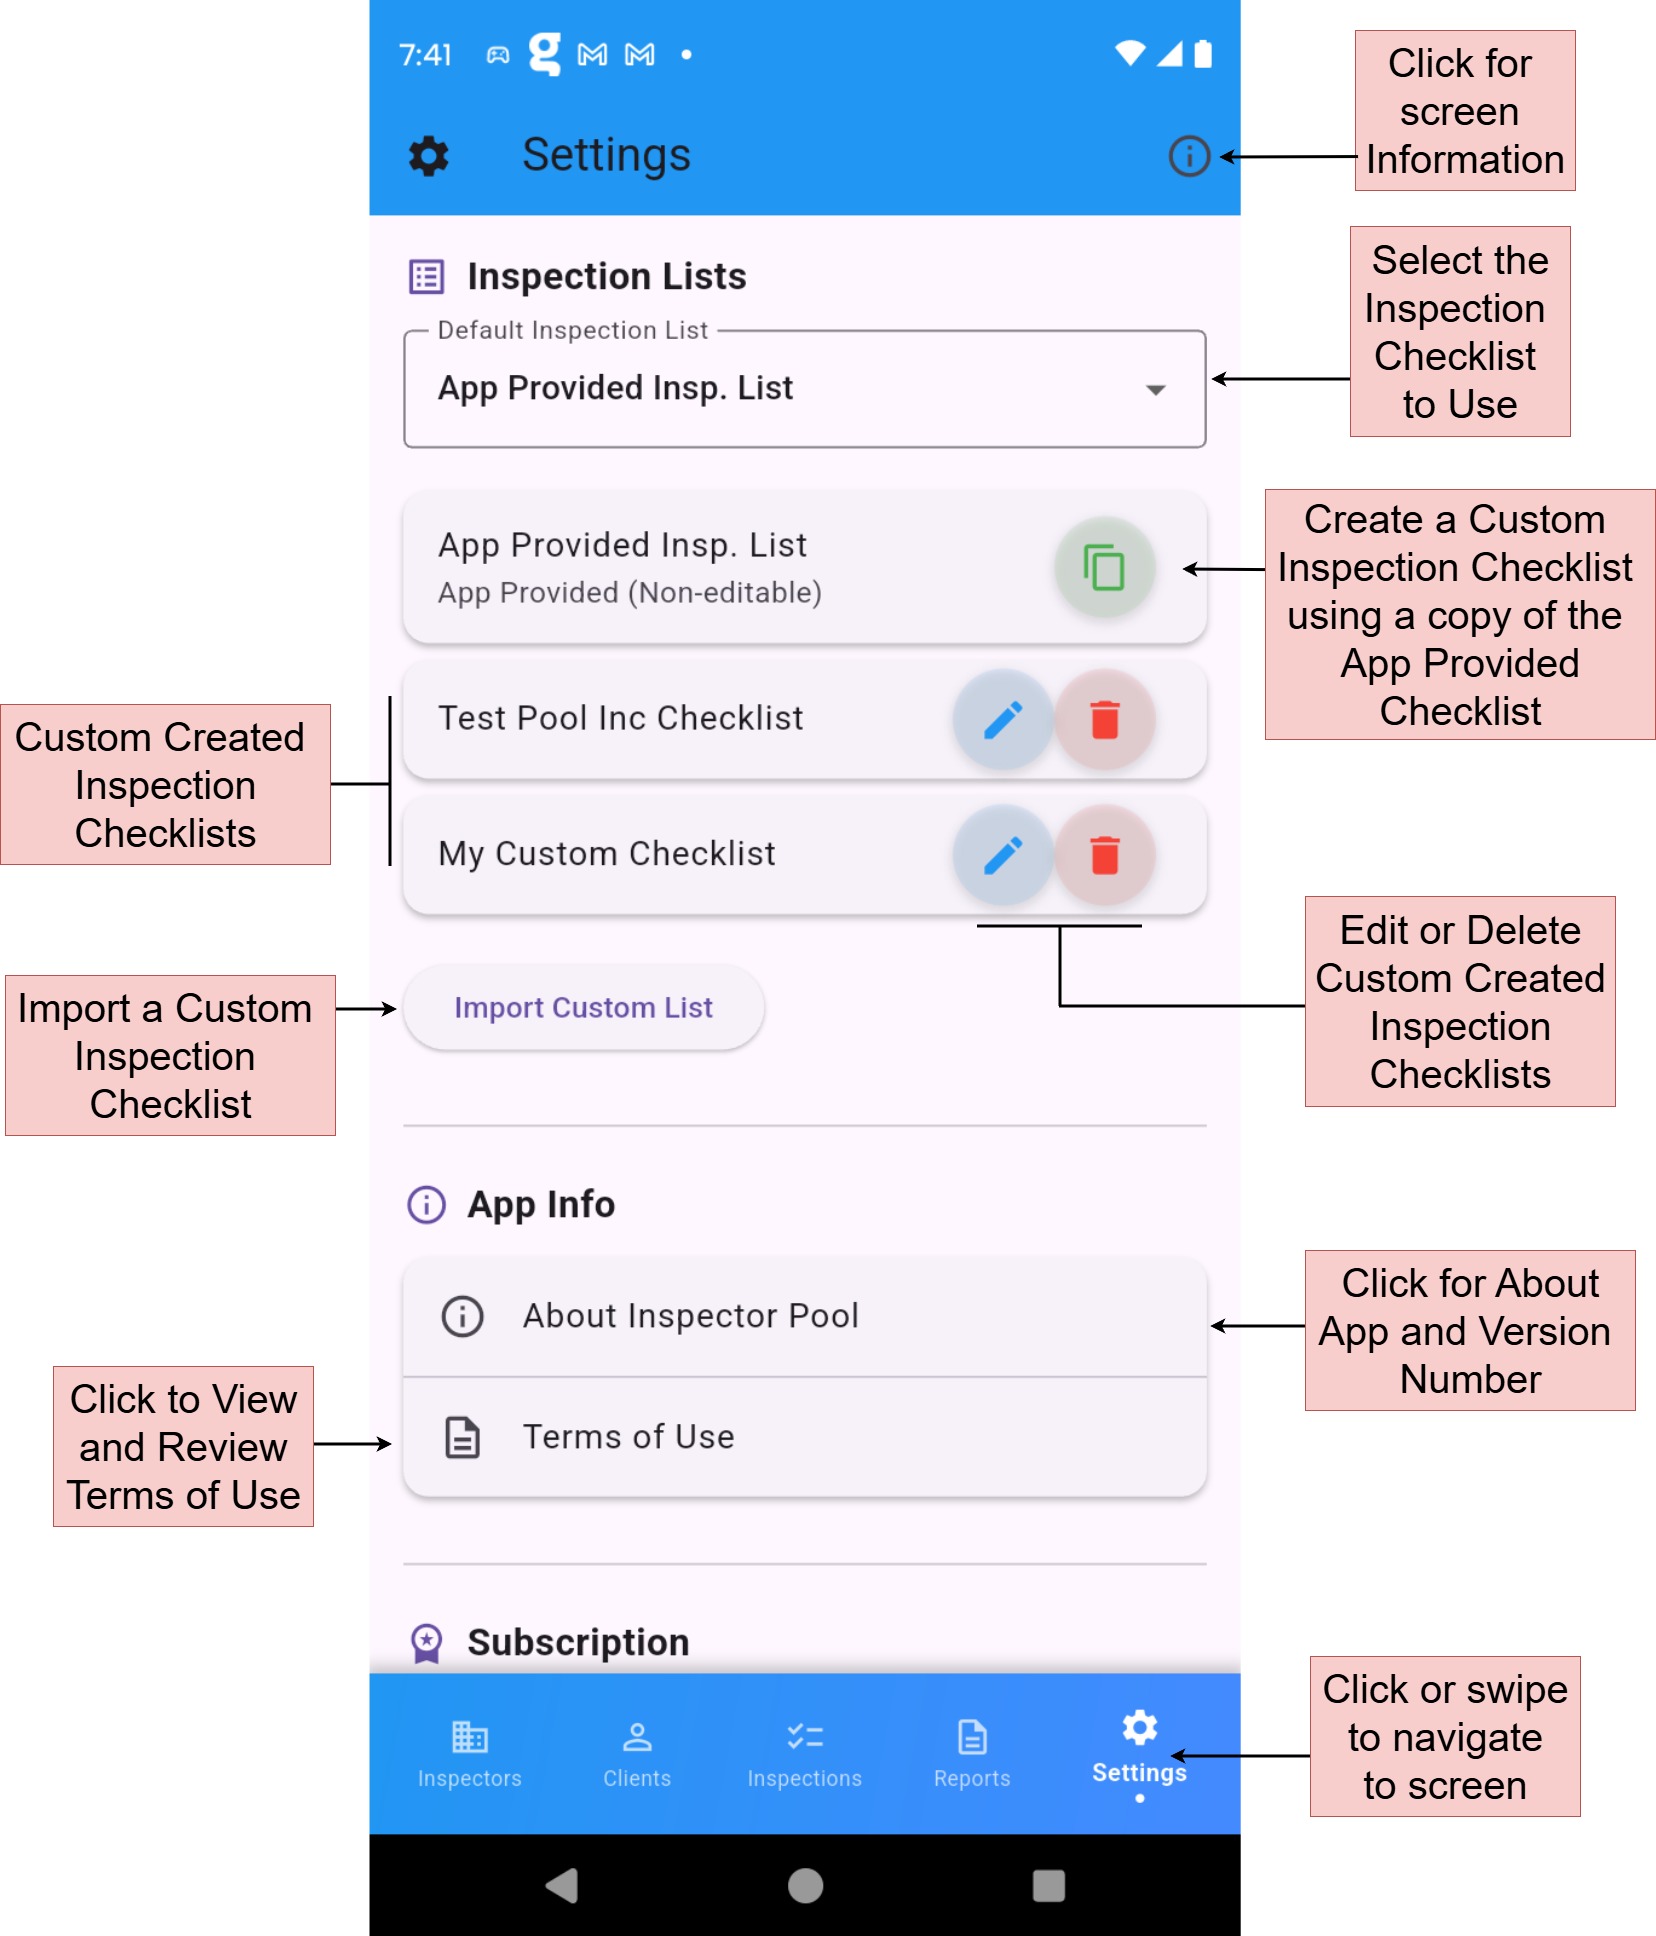
Inspection Lists
This section controls which checklist is used for new inspections and allows you to manage custom checklists.
Selecting the Default Inspection Checklist
Use the Default Inspection List dropdown to choose which checklist will be applied to all new inspections by default.
Important Notes:
- The default checklist applies only to new inspections.
- Existing inspections and reports remain unchanged.
App Provided Inspection List
The app includes a standard, non-editable checklist labeled "App Provided Insp. List". This is designed for consistent professional inspections. You cannot edit or delete it, but you can create a copy to customize it.
Creating a Custom Inspection Checklist
You can create custom checklists in two ways:
- Copy and Edit the App Provided List
Tap the copy icon next to "App Provided Insp. List". Give the new checklist a unique name, then edit categories and questions as needed. The new checklist will appear in your list of custom checklists and can be set as the default. - Import a Custom List via CSV
Tap Import Custom List and upload a.csvfile containing your custom inspection checklist. The file must meet the following requirements:- Use a
.csvfile format. - Include the header:
Category,Question,ResponseType. - Place each entry on a separate line, with values separated by commas.
- Set
ResponseTypeto eitherYesNofor questions requiring an explicit Yes or No answer, orTextfor questions needing open-ended responses.
Category,Question,ResponseType
Pool Area,Is the pool gate secure?,YesNo
Equipment Check,Filter pressure reading,Text
Download Example CSV
You must provide a unique name for the custom list. After importing, naming, and saving, the custom list appears in the Default Inspection List and can be set as the default checklist, edited using the pencil icon, or deleted using the trash icon. - Use a
Important Notes:
- Custom checklists can be set as the default checklist for new inspections.
- Deleting a custom list is permanent and does not affect existing inspections or reports.
- Ensure imported CSV files follow the specified format to avoid errors.
App Info
- About Inspector Pool: View the current app version and developer information.
- Terms of Use: Review the app’s terms and conditions.
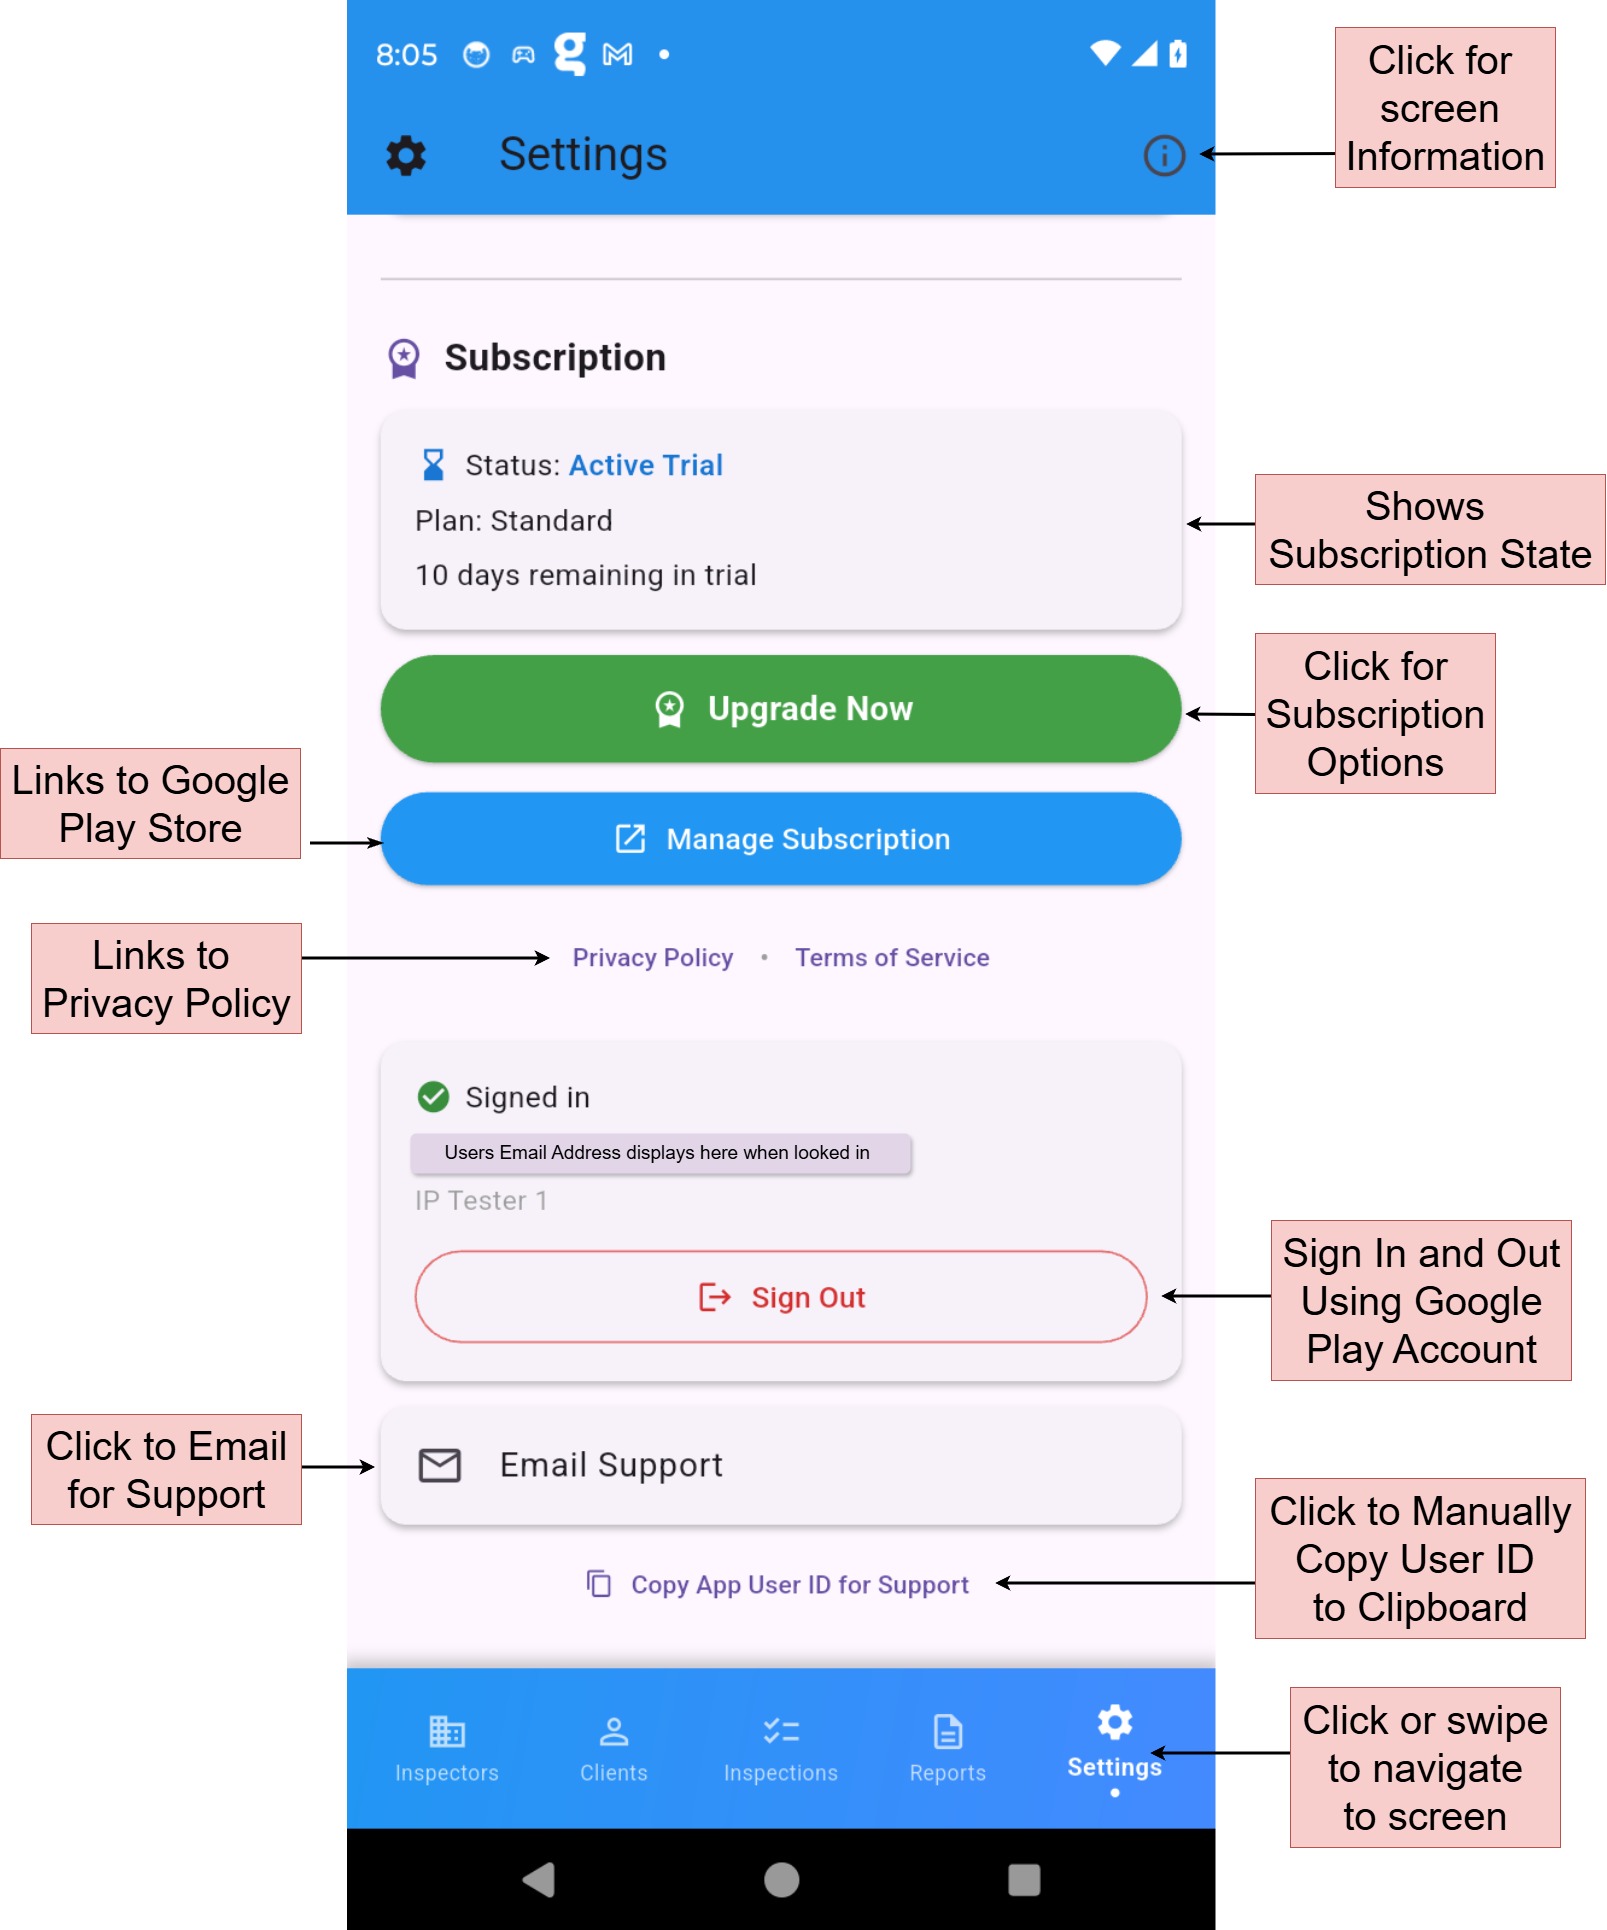
Subscription
This section shows your current subscription status (e.g., Active Trial, days remaining) and provides options to:
- Upgrade to a paid plan
- Manage your existing subscription (via Google Play)
Links to the Privacy Policy and Terms of Service are also available here.
Account & Support
- Signed In: Shows the email address associated with your Google account when signed in for multi-device support.
- Sign Out: Tap to sign out of your Google account.
- Email Support: Opens your email app with support contact pre-filled.
- Copy App User ID: Copies your unique App User ID to the clipboard. This is useful when contacting support.